Open topic with navigation
Maintaining Work Orders
- A Work Order is a request for work related to the Properties or Assets being managed.
- Work Orders can be set up to be repeated for preventative maintenance purposes.
- Work Orders can be turned into Purchase Orders, Invoices and Credit Notes and emailed.
- Work Orders can be manually entered here or created automatically by running the Work Order Repeats process.
Menu
Mandatory Prerequisites
Prior to creating a Work Order, refer to the following Topics:
Screenshot and Field Descriptions: Work Order Tab
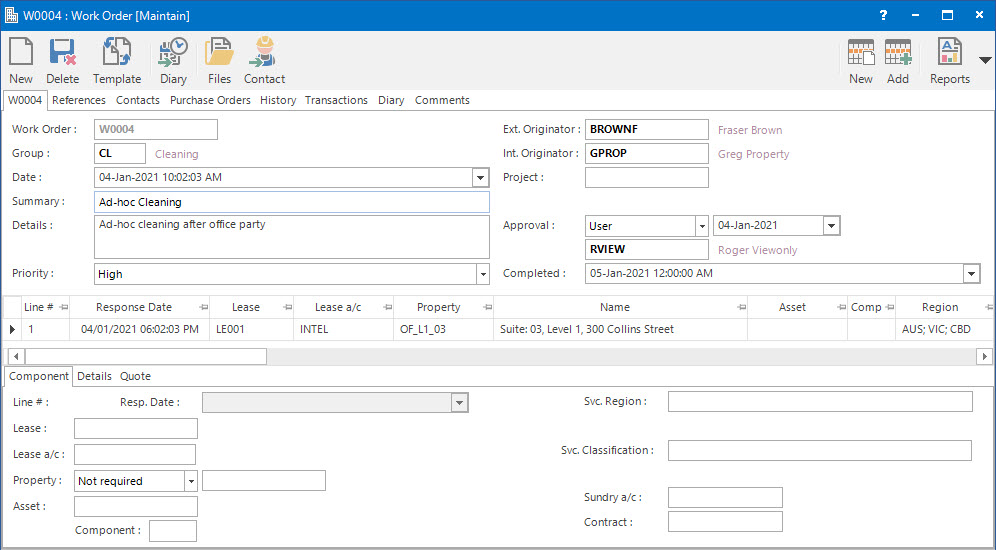
 Work Order: this is the primary identifier for the Work Order.
Group: this determines the Group that the Work Order belongs to. Groupings are useful in searches and reports.
 Date: this is the date / time the Work Order is raised on.
Summary: this is a text field to record the summary.
Details: this is a text field to record the details.
Priority: this is the priority of the Work Order.
When a Work Order Group is selected, the Priority drop down box is populated with the items attached to both the Work Order Group and the Priority List from the Response Times set up screen.
 Ext. Originator: this is the external Contact associated with the Word Order.
Int. Originator: this is the internal User responsible for the Work Order.
Project: this is the Project related to the Work Order.
Approval: this is the selection filter to select an external Contact / internal User for the Work Order approval. The options are:
- User: this option refers to the internal User assigned for the Work Order approval.
- Contact: this option refers to the external Contact assigned for the Work Order approval.
- Other: this option refers to any other contacts excluding the User / Contact for the Work Order approval.
Approval Date: this is the approval date of the Work Order.
Completed: this is the date / time of the Work Order completion.
Work Order Components table: this contains rows of Work Order Component items that have been entered and the Details and Quotes related to the components. New components can be added. Existing ones can be deleted or changed by selecting and double clicking. Their content can be maintained in the fields below the table.
Screenshot and Field Descriptions: Component Tab

Resp. Date: this is the date / time required to complete the Work Order.
When a Property is selected for the Component Line, the Resp. Date is automatically calculated based on the Work Order Date plus the Response Time set up for the selected Work Order Group, Priority and Property.
Lease: this is the Lease the Work Order will be raised for.
Lease a/c: this is the Lease Account related to the Work Order.
Property: this is a drop down list of the Properties that the selection can be filtered on. Select a value from the drop down list and the appropriate filter field will be displayed.
Asset: this is the Asset the Work Order will be raised for.
Component: this is the Asset Component number the Work Order will be raised for.
Svc. Region: this is the Service Region the Work Order relates to.
The Svc. Region field will be automatically populated, if the Property has been assigned to a Service Region.
Svc. Classification: this is the Service Classification the Work Order relates to.
Sundry a/c: this is the Sundry (Creditor) Account ID associated with the Work Order.
The Sundry a/c field can be automatically populated with the preferred supplier, if the Property and Sundry a/c records have been set up with Service Region and Service Classification values.
Contract: this is the Contract related to the Work Order.
The Contract field is automatically populated with the Contract assigned to the Sundry a/c.
Screenshot and Field Descriptions: Details Tab

Details: this is the additional detail of the Work Order.
Estimate: this is the estimated cost of the Work Order.
Actual: this is the actual cost for the Work Order.
Repeating Work Orders: the following optional fields relate to replicating the Work Order in future periods using the Work Order Repeats process:
Repeat Every: these fields are combined to determine the frequency of the Work Order.
- Day(s): this is the number of days the Work Order should be repeated again.
- Week(s): the is the number of weeks the Work Order should be repeated again.
- Month(s): this is the number of months the Work Order should be repeated again.
- Year(s): this is the number of years the Work Order should be repeated again.
Until: this is the date to repeat the Work Order until. It can be left blank.
Next: this date is initially set by the user as a trigger for the first repeat. It will be incremented automatically when the Work Order Repeats process is run. If this field is ever set to blank it will stop repeats from being created.
On-Charge: this will be the on-charge status of the Work Orders created from the Purchase Order. If the Work Order expense will be on-charged to the Tenants (Debtors), using the On-Charge process, then select one of the following options:
- Automatic: the Work Order will be on-charged based on the settings in the On-Charge Profile and the area of the Property.
- Manual: the Work Order will be nominated to be on-charged. When the transaction is saved the user will need to specify how the Work Order will be on-charged.
- Pending: the Work Order will be nominated to be on-charged but put on hold for now.
COA: this is the Chart of Account assigned to the Work Order and used for any Purchase Orders / Transactions raised from the Work Order.
Details: this is the description of the Work Order. It will default to the value set up for the COA assigned to the Work Order and will be used for any Purchase Orders / Transactions raised from the Work Order.
GST: this is the GST settings for the Work Order. It will default to the type set up for the COA assigned to the Work Order and will be used for any Purchase Orders / Transactions raised from the Work Order.
Inclusive: this check box is to nominate if the value in the Amount field will include GST or not.
GST From: this is a historical field and current use is now irrelevant. It was used during the implementation of GST to allow contractual date based transactions to escape full GST.
Cost Code: this is the Cost Code for the Work Order raised and used for any Purchase Orders / Transactions raised from the Work Order. This field can be set as optional, mandatory or not required on the COA set up screen.
Screenshot and Field Descriptions: Quote Tab

Date: this is the date of the quote for the Work Order.
From: this is the starting date the quote is valid for.
To: this is the end date until the quote is valid.
Quote $: this is the value of the quote.
Quote Hours: this is the estimated number of hours for the Work Order completion.
Approved: this is the internal User responsible for the quote approval.
Screenshot and Field Descriptions: Purchase Orders Tab
The Purchase Orders tab on the Work Order screen lists out all the Purchase Orders created from the Work Order.
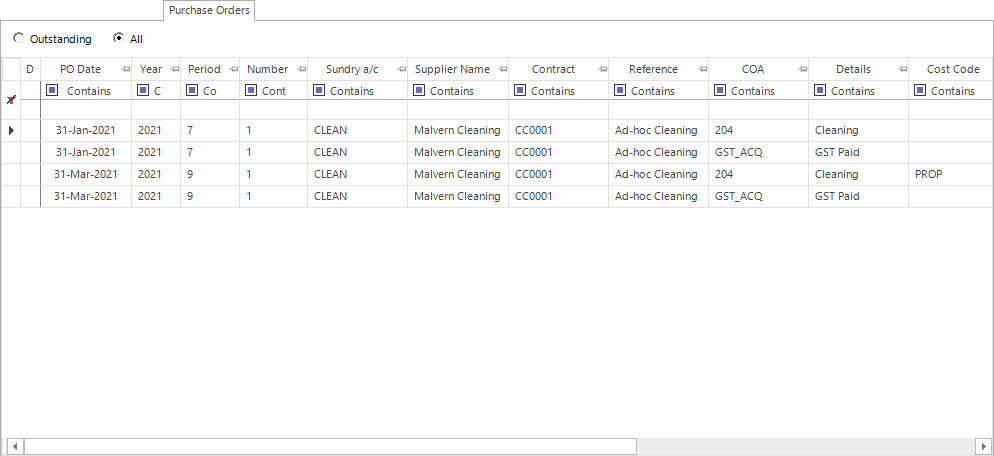
Purchase Orders table: this table contains rows of all the purchase orders associated with the Work Order.
Screenshot and Field Descriptions: Transactions Tab
The Transactions tab on the Work Order screen lists out all the transactions created for the Work Order.
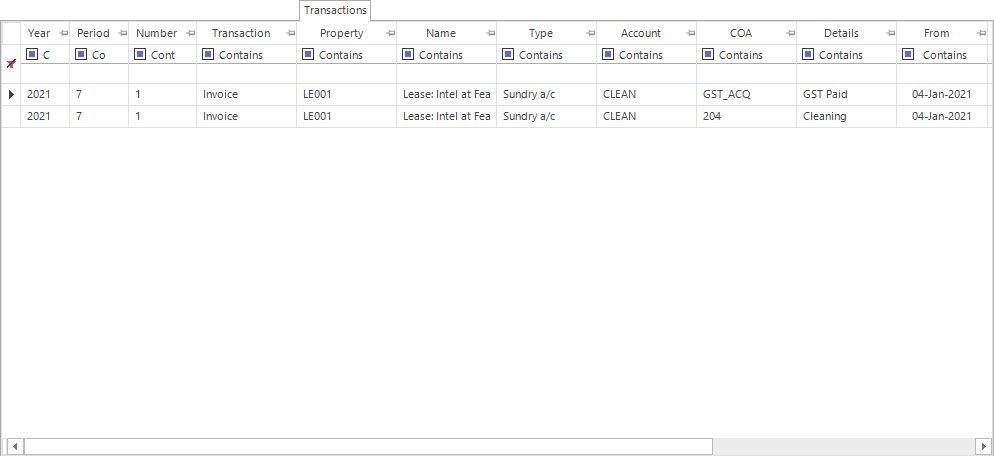
Transactions table: this table contains rows of transactions associated with the Work Order.
Shared or Site Optional Tabs
Other than Tabs described specifically in this Topic, the following may also be available (depending on Site Settings):
How Do I : Add a new Work Order
- At the Work Order field, enter a new Work Order ID.
- At the Group field, locate the enter the Work Order group you would
like to assign this Work Order to.
- The Date field will be populated with today's date but can be changed if required.
- At the Summary field, enter the summary information for the Work Order.
- At the Details field, enter the details of the Work Order.
- At the Priority field, select the appropriate priority from the drop down list.
- At the Ext. Originator field, locate the external contact for the Work Order.
- At the Int. Originator field, locate the internal user for the Work Order.
- At the Project field, locate the project for the Work Order if required.
- At the Approval field, select the appropriate contact for the Work Order approval if required.
- At the Approval Date field, select the approval date of the Work Order.
- At the Completed field, select the completion date of the Work Order.
- On the Components tab:
- The Resp.Date field is auto populated based on the Priority, Work Order Group and Property. Change the date if required. This field is editable only after a Property is selected.
- At the Lease field, if required, locate the lease for the Work Order.
- At the Lease a/c field, if required, locate the lease account for the Work Order.
- At the Property drop down list, select the required Property Type and enter the Property.
- At the Asset field, locate the asset for the Work Order if required.
- At the Component field, locate the asset component for the Work Order if required.
- At the Svc. Region field, enter the service region for the Work Order.
- At the Svc. Classification field, enter the service classification for the Work Order.
- The Sundry a/c field will be automatically populated with the preferred supplier, if only one Sundry a/c has been assigned to the Service Region and Service Classification. The Sundry a/c search screen needs to be used to select an account, if multiple Sundry a/cs have been assigned to the Service Region and Service Classification.
- At the Contract field, locate the contract with the Sundry a/c.
- On the Details tab:
- At the Details field, enter the required details for the Work Order.
- At the Estimate field, enter the estimated cost for the Work Order.
- At the Actual field, enter the actual cost when known.
- If the Work Order is to be automatically repeated, at the Repeat Every field, enter the frequency of the number of days, months, weeks or years the Work Order needs to be repeated if required. At the Until and Next fields, select the date the Work Order needs to be repeated to and the next date for the Work Order to be repeated on.
- At the On-Charge field, locate the required on-charge type for the Work Order.
- At the COA field, select the required COA for the Work Order.
- The Details field will be automatically populated with the COA details based on the COA that is selected for the Work order. Change the details if required.
- At the GST field, select the required GST for the Work Order.
- Tick the Inclusive check box, if the Amount field will include GST. Otherwise the GST component will be calculated and added separately.
- The GST From date will default to the value set up for GST.
- On the Quotes tab:
- At the Date field, select the quote date of the Work Order.
- At the From field, select the start date of the Work Order quote.
- At the To field, select the end date of the Work Order quote.
- At the Quote $ field, enter the quote amount of the Work Order.
- At the Quote Hours field, enter the estimated quote hours of the Work Order.
- At the Approved field, select the required user / contact for the Work Order quote approval. Select the quote approval date on the date selection field next to the Approved field.
- Click the Right Hand Side Application tool-bar push button: Add.
- Repeat these steps to add (change or delete) more Components to the Work Order.
- Switch to the References tab, and if there are fields available, enter any additional information required.
- Switch to the Comments tab, and enter any additional comments relating to the Work Order.
- Click the Left Hand Side Application tool-bar push button: Change.
- Confirm that you wish to add the record.
How Do I : Modify an existing Work Order
- At the Work Order field, enter a new Work Order ID.
- At the Group field, change the enter the Work Order group you would
like to assign this Work Order to.
- At the Date field, change the date of the Work Order if required.
- At the Summary field, change the summary information for the Work Order.
- At the Details field, change the details of the Work Order.
- At the Priority field, change the appropriate priority from the drop down list.
- At the Ext. Originator field, change the external contact for the Work Order.
- At the Int. Originator field, change the internal user for the Work Order.
- At the Project field, change the project for the Work Order if required.
- At the Approval field, select the appropriate contact for the Work Order approval if required.
- At the Approval Date field, select the approval date of the Work Order.
- At the Completed field, change the completion date of the Work Order.
- For the maintenance of the Work Order Components table, the user has the following options:
- Add a new component by entering in the fields on the Component, Details and Quote tabs and clicking the Right Hand Side Application tool-bar push button: Add to add the Component to the Work Order Components table.
- Change an existing component by double clicking a line in the Component tab and modifying any fields on the Component, Details and Quote tabs if required, and clicking the Right Hand Side Application tool-bar push button: Change.
- Delete an existing component by double clicking a line in the Component tab and clicking the Right Hand Side Application tool-bar push button: Delete.
- If any of the components need to be cleared, click the Right Hand Side Application tool-bar push button: Wipe.
- Switch to the References tab, and if there are fields available, enter any additional information required.
- Switch to the Comments tab, and enter any additional comments relating to the Work Order.
- Click the Left Hand Side Application tool-bar push button: Change.
- Confirm that you wish to change the record.
How Do I : Delete an existing Work Order
- At the Work Order field, locate the Work Order.
- Click the Application tool-bar push button: Delete.
- Confirm that you wish to delete the record.
How Do I : E-Mail a Work Order
- At the Work Order field, locate the Work Order.
- Double click on the required Component on the Work Order screen.
- Click the Application tool-bar push button: E-Mail.
- The E-Mail application is displayed with the Work Order information.
- Refer to Sending E-Mails for field descriptions and how to send the e-mail.
How Do I : Create a Purchase Order from a Work Order
- At the Work Order field, locate the Work Order.
- Double click on the required Component on the Work Order screen.
- Click on the Application tool-bar push button: Purchase Order or click on the drop down list of the Application tool-bar push button: Purchase Order to select the Manual option and the Purchase Order screen will display with the Work Order information to be created.
- Refer to Entering Creditor Sundry a/c Purchase Orders for field descriptions and how to create the Purchase Order.
- To create a Purchase Order automatically from the Work Order screen, click on the drop down list of the Application tool-bar push button: Purchase Order and select the Automatic option.
How Do I : Create an Invoice from a Work Order
- At the Work Order field, locate the Work Order.
- Double click on the required Component on the Work Order screen.
- Click the Application tool-bar push button: Invoice.
- The Creditor Sundry a/c Invoice screen is displayed with the Work Order information.
- Refer to Entering Creditor Sundry a/c Invoices for field descriptions and how to create the Invoice.
How Do I : Set up a Work Order for Yearly preventative maintenance purposes
Refer to How Do I : Add a new Work Order:
- On the Details tab, at the Repeat Every field, enter a numeric value in the first field and select the Year(s) option from the drop down list.
- At the Until field, enter the date the Work Order needs to be repeated to.
- At the Next field, enter the date the Work Order needs to be repeated on.
- Enter remaining fields as required.
- Refer to Running the Work Order Repeats Process for creating repeating Work Orders for preventative maintenance purposes.
Related Topics
Work Orders are associated with the following Topics: